Secure Boot BIOS Customization (AN39): Difference between revisions
Piotrkorsak (talk | contribs) mNo edit summary |
Arthurbesler (talk | contribs) Note: PK |
||
| Line 172: | Line 172: | ||
<br> | <br> | ||
'''Note:''' | '''Note:''' | ||
''''It is important to install the other Secure Boot keys before | '<nowiki/>'''It is important to install the other Secure Boot keys before enrolling the Platform Key (PK). Once the PK is enrolled, the system transitions into "User Mode", at which point it is no longer possible to install the Key Exchange Key (KEK) or the signature database keys (db) — unless those keys are already signed with the PK.'''' | ||
{{Continue Numbered List|5|After a system reboot, the Secure Boot keys are installed.}} | {{Continue Numbered List|5|After a system reboot, the Secure Boot keys are installed.}} | ||
| Line 233: | Line 233: | ||
'''After installing the Secure Boot keys, saving and exiting, the OS can no longer boot if it is a non-signed OS. To boot a non-signed OS again, go to the BIOS setup menu and disable Secure Boot.''' | '''After installing the Secure Boot keys, saving and exiting, the OS can no longer boot if it is a non-signed OS. To boot a non-signed OS again, go to the BIOS setup menu and disable Secure Boot.''' | ||
[[Category:Application Notes]] | [[Category:Application Notes]] | ||
Latest revision as of 14:53, 22 September 2025
| Affected Products | Products featuring firmware supporting the UEFI Secure Boot feature |
|---|
Preface
This Application Note explains the OEM specific customizations required to deploy a Secure Boot enabled BIOS. Although all latest congatec embedded BIOS releases offer Secure Boot support, it is still necessary to customize the BIOS with the OEMs Secure Boot keys, especially the Platform key (PK).
Terminology
| Term | Description |
|---|---|
| BIOS | Basic Input Output System |
| UEFI | Unified Extensible Firmware Interface |
| CSM | Compatibility Support Module |
| RSA | Asymmetric public key cryptosystem named after their inventors Rivest, Shamir and Adleman |
| SHA | Secure Hash Algorithm |
Secure Boot Introduction
Secure boot is a security standard to ensure that a PC boots using only software trusted by the Original Equipment Manufacturer (OEM). It was developed to prevent any unauthorized software from loading in the pre-boot space.
When the PC starts, the firmware checks the signature of each piece of boot software, including UEFI firmware drivers (also known as Option ROMs), EFI applications, and the operating system. If the signatures are valid, the PC boots, and the firmware gives control to the operating system bootloader.
Secure Boot ensures that only properly signed and verified boot loaders and EFI drivers are executed. Secure Boot was introduced in the UEFI specification version 2.3.1. The current UEFI specification can be downloaded from www.uefi.org
Secure Boot Requirements
Two requirements must be met in order to enable Secure Boot:
- CSM must be disabled
- Platform Key (PK) variable must be installed
Caution:
The pre-installed default PK (from the BIOS vendor American Megatrends Inc. or from congatec GmbH) MUST NOT be used to deploy Secure Boot.
Secure Boot Variables
There are two keys and two signature databases that play an important role for the Secure Boot mechanism:
- Platform Key (PK): establishes trust relationship between platform owner (OEM) and platform firmware (BIOS)
- Key Exchange Key (KEK): establishes trust relationship between OS (e.g. MS Windows) and platform firmware (BIOS)
- db (Good Signature Database = White List)
- dbx (Revocation Signature Database = Black List)
In a customized BIOS with Secure Boot support enabled, the PK, KEK and db (optional) variables are typically provided by the customer as OEM certificates.
The dbx variable is kept up to date by congatec by replacing this database with the latest UEFI Revocation list from https://uefi.org/revocationlistfile every time a new BIOS is released.
The Platform Key is a self-signed root key and consists of a public and private key. Only the public part of the key (PKpub) is required for the customized BIOS. The private part of the key (PKpriv) must remain with the customer at a secure location.
Caution:
Never expose PKpriv to the public. PKpriv is only used to sign the KEK variable.
A KEK is used to sign the db and dbx signature databases. By default, a KEK variable contains two Microsoft keys. See section Secure Boot Setup Support below for more information.
The UEFI specification defines two additional signature databases not commonly used and also not required and therefore not covered in this document:
- dbt (time stamp signature database)
- dbr (recovery signature database)
Key Formats
Secure Boot support the following three key formats:
- RSA-2048 Key with a fixed certificate size of 2048 bits
- SHA256 Hash with a fixed certificate size of 32 bytes
- X509 Certificate with a typical size of >1kb
A X509 certificate contains information about a key, including:
- name of the issuer
- validity time frame
- relationship to the trusted root certificate key
- digital signature of the key made with the root key
congatec supports the common X509 key certificate in its Embedded BIOS solution. Customers requesting a BIOS with Secure Boot support need to provide their OEM specific keys as x509 ASN.1 DER files (usually ending in .cer).
A key file in PEM format needs to be converted to DER - for example by using the command line OpenSSL:
openssl x509 -outform der -in OEM_PK.pem -out OEM_PK.der
Key Provisioning
OEMs have two options to provision their specific keys:
- User initiated from BIOS setup program (time consuming, only suitable for low volume products.) See section Secure Boot Setup Support for more information.
- Customized BIOS with built-in (factory) OEM keys (for high volume products). See section congatec Secure Boot BIOS Customization for more information.
Secure Boot Setup Support
The congatec Embedded BIOS allows to configure a system for Secure Boot in BIOS setup. You can find the "Secure Boot" submenu under the "Security tab".

Before Secure Boot can be enabled, the OEM keys must be added to the BIOS and the Secure Boot Mode must be set to Custom. Use the >Key Management sub menu to add your specific keys, especially the PK and KEK signed with your PK.

When the Secure Boot variables are configured for the first time, the Secure Boot is in setup mode. This means that the keys are not installed (as shown in Figure 3 below).

The preferred way to customize the keys in BIOS setup is to first load the built-in default keys. This can be achieved with the setup node >Restore Factory Keys. The main purpose is to load valid db and dbx signature databases. The factory PK and KEK must be overwritten with your OEM keys. The Test (AMI) PK is only for Secure Boot testing and must not be deployed to the field!
.png)
The key management setup support offers several options to customize the secure boot variables (see Figure 2). Use the Update option to replace the factory PK and KEK with your OEM specific keys loaded from a file system (e.g. on a USB stick). Then update the Secure Boot variables. An example is shown in Figure 5 below. PK and KEK were loaded from external storage and the built-in signature databases (db and dbx) are used. You can also replace the factory signature databases with your OEM specific ones.
.png)
Now that the Secure Boot keys are installed, Secure Boot can be enabled under the Security tab. After a platform reset, the system is in Secure Boot mode.
Note:
Always protect the BIOS setup with a password to prevent non-authorized users from changing the system configuration (disabling Secure Boot).
congatec Secure Boot BIOS Customization
congatec developed an OEM Secure Boot support module for quick and easy BIOS customization. OEM keys in X.509 ANS.1 DER Public Key Certificate format can be instantly added to the BIOS build process. Such a full custom (source code) BIOS usually requires the mandatory OEM public PK, KEK and optionally the db keys.
OEMs have three options for the KEK and db signature databases:
- Use the BIOS default keys:
- MS Windows PCA (public certificate authority) for Microsoft OS
- MS UEFI CA for Linux boot loaders and 3rd party EFI drivers
- Append OEM keys to BIOS default keys:
- MS Windows PCA
- MS UEFI CA
- OEM Key
- Use only OEM keys and remove MS keys - only starts OEM signed boot loaders and executables. MS Windows and standard Linux boot loaders are not started in this configuration.
Note:
- Always protect the BIOS setup with a password to prevent non-authorized users from changing the system configuration (e.g. from disabling Secure Boot).
- With such a Secure Boot enabled OEM BIOS, the system can only boot certain operating systems/boot loaders. Older operating systems (e.g. MS-DOS, Windows 7) and unsigned Linux bootloaders, as well as the UEFI shell, cannot be used anymore. This can limit options for system diagnostics and debugging.
- For more information about congatec’s Secure Boot customization, contact congatec technical support at support@congatec.com
Key Generation and Driver Signing
The most common tools for OEM key generation and driver signings are:
signtooL.exe(Windows)MakeCert.exe(Windows)OpenSSL(Windows, Linux)
The usage of these tools is beyond the scope of this Application Note. Please refer to available literature for a detailed description how to run these tools to sign drivers and generate key certificates.
Useful links:
- OpenSSL: https://www.openssl.org
Secure Boot Without Custom BIOS
It is possible to install Secure Boot keys without a custom BIOS. Non-signed kernels can boot without a Platform Key (PK) installed (default BIOS conifiguration). Secure Boot is active after installing the keys and rebooting the device.
In Linux
- Ensure the BIOS is up to date by following the instruction in this application note: "BIOS Setup Description (AN42)".
- If necessary, update the BIOS to the latest version by following the instruction in this application note:"BIOS Update (AN01)".
- Boot the Linux OS, open the terminal and follow the instructions in this link to generate all the keys. https://wiki.gentoo.org/wiki/User:Sakaki/Sakaki%27s_EFI_Install_Guide/Configuring_Secure_Boot_under_OpenRC
- After generating the keys, install them using the following commands:
efi-updatevar -f db.auth dbefi-updatevar -f KEK.auth KEKefi-updatevar -f PK.auth PK

Figure 6 : Commands to install the generated keys

Note:
'It is important to install the other Secure Boot keys before enrolling the Platform Key (PK). Once the PK is enrolled, the system transitions into "User Mode", at which point it is no longer possible to install the Key Exchange Key (KEK) or the signature database keys (db) — unless those keys are already signed with the PK.'
- After a system reboot, the Secure Boot keys are installed.

Figure 7: Keys are installed in BIOS

- After completing the process to add the keys, enable Secure Boot.
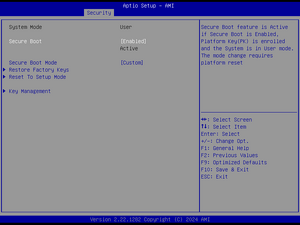
Figure 14: Enable secure boot

Note After installing the Secure Boot keys, saving and exiting, the OS can no longer boot if it is a non-signed OS. To boot a non-signed OS again, go to the BIOS setup menu and disable Secure Boot.
In Windows
Step 1: Create a working directory
- Open Windows Powershell as an Administrator.
- Create a directory to store the keys. For example:
mkdir C:\SecureBootKeys
- Navigate to the directory:
cd C:\SecureBootKeys
Step 2: Generate the keys and certificates
- For Platform Key (PK):
openssl req -new -x509 -newkey rsa:2048 -keyout PK.key -out PK.crt -days 365 -subj "/CN=Platform Key"
- For Key Exchange Key (KEK) :
openssl req -new -x509 -newkey rsa:2048 -keyout KEK.key -out KEK.crt -days 365 -subj "/CN=Key Exchange Key"
- For Database Key (db):
openssl req -new -x509 -newkey rsa:2048 -keyout db.key -out db.crt -days 365 -subj "/CN=Signature Database"
Step 3: Convert the certificates to .der format
- For PK:
openssl x509 -in PK.crt -outform DER -out PK.der
- For KEK:
openssl x509 -in KEK.crt -outform DER -out KEK.der
- For db:
openssl x509 -in db.crt -outform DER -out db.der
Step 4: Add the .der files to the Certificate store
- For PK:
certutil -f -addstore "Platform" "C:\SecureBootKeys\PK.der"
- For KEK:
certutil -f -addstore "TrustedKey" "C:\SecureBootKeys\KEK.der"
- For db:
certutil -f -addstore "TrustedDB" "C:\SecureBootKeys\db.der"
The screenshots below show the steps 1 to 4 above.


Optional step: Manual Key Enrollment in UEFI (if necessary)
If adding the keys viacerutilfails, enroll them via the UEFI interface
- Format a USB drive as FAT32 and copy the
.der filesto it - Reboot the system and enter the UEFI/BIOS setup
- Under the "Security" tab, navigate to Secure Boot Menu-> Key Management->Secure Boot Variables
- The following screenshots demonstrate how to install the Key Exchange Key (KEK) as an example
- Select the key to install and select "Update"
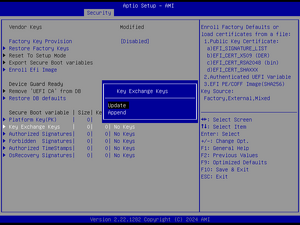
FIgure 10: Update

- Select "No" to choose the key from the USB drive
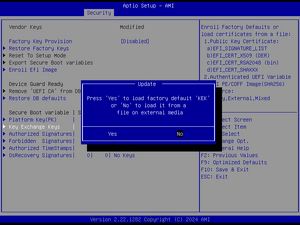
Figure 11: Select "No"

- Select the USB drive

Figure 12: Select USB

- Select the corresponding
.derfile for the KEK key
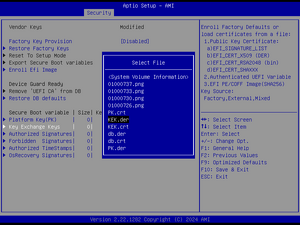
Figure 13: Select appropriate file

- Repeat the process for the Signature Database key (db) and the Platform Key (PK)
5. After completing the process to add the keys, enable Secure Boot.
Figure 14: Enable secure boot
Note:
After installing the Secure Boot keys, saving and exiting, the OS can no longer boot if it is a non-signed OS. To boot a non-signed OS again, go to the BIOS setup menu and disable Secure Boot.