BIOS Update (AN01): Difference between revisions
Eugenbeluga (talk | contribs) No edit summary Tag: Manual revert |
mNo edit summary Tag: Manual revert |
||
| (One intermediate revision by the same user not shown) | |||
(No difference)
| |||
Latest revision as of 14:16, 19 December 2025
| Affected Products | Products featuring UEFI Firmware |
|---|
Preface
This Application Note provides information about updating the embedded BIOS on congatec products.
Terminology
| Term | Description |
|---|---|
| UEFI | Unified Extensible Firmware Interface |
| AMI | American Megatrends, Inc - congatec’s BIOS partner |
| Aptio | AMIs UEFI Firmware product |
| POST | Power On Self Test |
| ME | Management Engine firmware on Intel Core platforms |
| TXE | Trusted Execution Environment firmware on Intel Atom platforms |
| CGOS API | congatec operating system application programming interface |
| CGUTIL | congatec System Utility |
| COM | Computer on Module |
| SBC | Single board computer |
| GUI | Graphical user interface |
Introduction
The BIOS firmware is stored in an onboard flash memory chip and can be updated by using the congatec system utility (CGUTIL). The flash tool can be found on the congatec web page at www.congatec.com This application note describes how to update the BIOS and uses the conga-TS170 as an example. The BIOS update must be performed on all other CPU products in the same way as described in this application note.
The BIOS displays a message during POST and on the main setup screen identifying the BIOS project name and a revision code. The initial production BIOS is identified as BQSLRxxx.bin, where 'BQSL' is the congatec internal BIOS project name, 'R' is the identifier for a BIOS file and 'xxx' is a sequential number that defines the revision of the BIOS file.
Note:
The file extension “.bin” is default for all new UEFI based products. The handling within the command line or GUI version of the congatec system utility does not change as a result of different file extension. Most new BIOS binary files include supplementary parts of the products firmware in addition to the UEFI firmware itself. For Intel based BIOS versions this is referred to as ME or TXE binary.
The BIOS can be determined during BIOS POST and in the BIOS Setup (Main Menu):


Using CGUTIL for BIOS Update
There are several ways to update the BIOS of a congatec product. This application note describes the Windows GUI as well as the DOS, UEFI and Linux command line version of the congatec System Utility.
When using the Windows GUI version, some additional drivers must be installed:
- The required driver package can be found at www.congatec.com
- Select the software section of the regarding product and download the CGOS API as well as the congatec System Utility.
- Extract the zip files.
- Follow the instructions in the readme.txt to install the required driver packages.
The DOS and UEFI based version of the congatec System Utility do not require any additional software or driver packages. It can be run in the command line from a computer started by a DOS or UEFI shell equipped USB memory stick.
The BIOS updating process within the UEFI Shell is very similar to how it’s done in DOS.
It is necessary to download and install the actual version of the congatec System Utility as well as the CGOS API in order to perform the steps explained in the subsections BIOS update in Windows and BIOS update in Linux
Section BIOS update in Windows illustrates how to update the BIOS when using the Windows GUI version of CGUTIL. The sections BIOS update in DOS or UEFI and BIOS update in Linux are showing the BIOS update process when using the DOS, UEFI and Linux version of CGUTIL.
Caution:
Do not interrupt the congatec System Utility during the BIOS Update procedure regardless of the version used. Otherwise, this will lead to a corrupted BIOS in the flash chip causing the CPU module to be no longer bootable.
Note:
Do not use the congatec System Utility to save a BIOS binary from flash to a file as explained in previous revisions of this document. UEFI firmware is writing to the flash a lot during boot-up and even at runtime. The image read back would never be the original BIOS binary. It must not be used to update additional CPU products.
BIOS update in Windows
- Firstly, either contact the congatec technical support or visit the restricted area on the congatec web page to get the latest BIOS revision for the CPU product you are using. Store the appropriate BIOS in a temporary folder.
- Open the “congatec System Utility.”
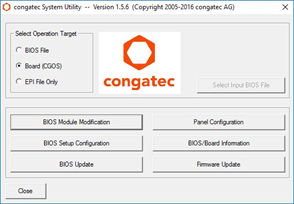
- Select “Board (CGOS)” as operating target.
- Push the button “BIOS Update”.
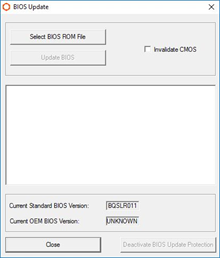
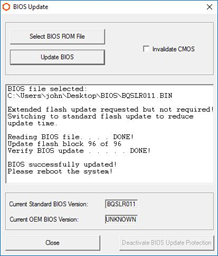
- Click “Select BIOS ROM File”
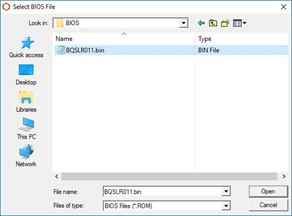
- Browse for your designated BIOS binary file (in this example “BQSLR011.bin”).
- The selected BIOS binary file is now displayed in in the middle of the BIOS Update dialog box
- The lower section shows the current BIOS version and if available the current OEM BIOS version, which are stored in the COM or SBC onboard flash memory chip.
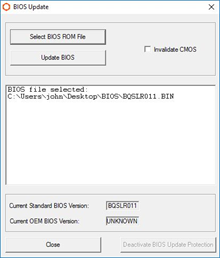
- Click on the “Update BIOS” button to start the update procedure.
- The option “Invalidate CMOS” is deactivated by default and has no effect on UEFI based firmware.
- Reboot the system to finish the update process.


Note:
The BIOS update procedure may take a while. After all blocks have been updated and the BIOS update has been validated, restart the computer and enter the system BIOS setup program. Once entered, load the defaults. To do so, press 'F9' to load the defaults and 'F10' to store and exit the BIOS setup screen. Due to the increased file size of newer BIOS BIN files, the number of flash blocks to be updated can be up to 256 for 16MB BIOS files. This will be displayed during the update process within the congatec utility and can also lead to increased update time. The button 'Deactivate BIOS Write Protection' must be pressed if the BIOS write protection is activated. For more information (including CGUTIL DOS usage) about this congatec Embedded BIOS feature see the Application Note BIOS Update and Write Protection (AN05)
BIOS update in DOS or UEFI
- Get the latest BIOS version of the concerned congatec CPU board.
- Store the BIOS binary file on a DOS or UEFI bootable USB Stick. Make sure the BIOS binary file is in the same directory as the DOS or UEFI version of the congatec System Utility. Enter the directory which contains the CGUTIL. The BIOS update is accomplished by entering the following command at the prompt:
cgutlcmd bflash BIOSNAME.bin /e - The parameter BIOSNAME.bin stands for the name of the BIOS file, e.g. “BQSLR011.bin”.
cgutlcmd bflash BQSLR011.bin /e - After all blocks have been updated and the BIOS update has been validated, restart the system, enter the system BIOS setup program and load the default settings.
Note:
Pay attention to the parameter “/e” within the command line in step 3. This is necessary to ensure a full flash update of new UEFI firmware BIOS files. The tool itself will clarify the need for a full update and perform it if required. A full update means that not only the UEFI firmware content will be flashed to the flash part but also any additional firmware that is required (for example ME and TXE binaries). See next chapter for more details.
BIOS update in Linux
- Get the latest BIOS version of the concerned congatec CPU board.
- Download the latest version of the CGOS API and congatec System Utility from www.congatec.com
- Unzip the compressed files.
- Follow the instructions in the .txt files and the CGUTIL User’s Guide.
- Open a command prompt and enter the following line in order to update the BIOS:
cgutlcmd bflash BQSLR011.bin /e - Reboot the system after the BIOS update has been validated.
Note:
Make sure that the BIOS binary file is in the current working directory or reference to the absolute path. Also be aware that Linux is case sensitive. Therefore, please keep the spelling of the BIOS file. Pay attention to the parameter “/e” within the command line in step 5. See chapter 3 for more information.
CGUTLCMD Command Line Parameters
The command line version of the congatec System Utility supports the parameters below. It is important to understand the reason behind these parameters in order to use them in the correct way.
“/f” to force the BIOS flash update
CGUTLCMD has a built-in mechanism to prevent the user from flashing a wrong BIOS file onto a CPU board. When called without “/f” only a BIOS with the same 4 letter BIOS project name as the one that is currently on the flash is accepted. For example, you can not flash the BHSLR011.BIN BIOS onto a conga-TS170 module running the BQSLR011.BIN BIOS because the BIOS project names (BQSL vs BHSL) are not identical. With the “/f” parameter, this protection mechanism is deactivated and any BIOS with the same size as the flash part can be updated.
Note:
Only use /f when you know what you are doing!!!
“/e” for extended BIOS flash update
This parameter instructs CGUTLCMD to perform a full flash update and not only update the UEFI firmware in the flash chip. Especially newer Intel platforms use the BIOS flash to store additional information like TXE or ME binaries or the configuration file of the integrated Ethernet controller. The figure below explains the “/e” usage:

For most BIOS updates, only the UEFI firmware needs to be flashed because the “extended” flash content usually does not change very often.
The congatec system utility auto detects if a full flash update is necessary or not and prompts the user to use the /e parameter in case it is necessary.
On the other hand, when /e is used but the full update is not necessary because the extended flash content is the same on the new and current BIOS, the system utility skips the extended update and only flashes the flash blocks of the UEFI firmware to safe time.
“/ef” - to force an extended BIOS flash update
The /ef parameter forces the full BIOS flash update (UEFI firmware + extended area). It’s only used in special cases. Such a special case is, for example, the onboard BIOS flash recovery after booting from an external flash part on the carrier board. The onboard BIOS flash might be completely empty or not have the correct extended BIOS image programmed.
Updating the BIOS with /ef should not be the preferred way of using CGUTLCMD because all flash blocks will be updated which takes a long time.
Examples
Flash UEFI firmware of BQSLR011.bin file only. In case the extended area on the flash part is different than the one in BQSLR011.bin, the utility prompts the user for the /e parameter for full BIOS flash update.
cgutlcmd bflash BQSLR011.bin
In case the extended area is the same on the flash part and in BQSLR011.bin, safe time and only flash the UEFI firmware. In case the extended areas are different, perform a full flash update.
cgutlcmd bflash BQSLR011.bin /e
No matter whether the extended area is different or not, always update the complete BIOS file.
cgutlcmd bflash BQSLR011.bin /ef
No matter which BIOS is on the target CPU product, update the UEFI firmware with BQSLR011.bin
cgutlcmd bflash BQSLR011.bin /f
No matter which BIOS is on the target system, update the complete BIOS flash (UEFI firmware + extended area) with BQSLR011.bin
cgutlcmd bflash BQSLR011.bin /ef /f