Configure RAID System (AN15): Difference between revisions
Samuelguth (talk | contribs) Created page with "{| class="wikitable" |Applicable Products |conga-XLX, conga-CLX, conga-B945, conga-BM45 |} ==Preface== This application note is a short example of how to setup and configure a system to operate in RAID Level 1 (Mirror) with two Serial ATA (SATA) hard disk drives (HDD) while using Microsoft Windows<sup>®</sup> XP. ==Terminology== Some of the following terms may be used throughout this document. {| class="wikitable" |'''Term''' |'''Description''' |- |RAID |RAID: Redun..." |
Samuelguth (talk | contribs) |
||
| Line 10: | Line 10: | ||
Some of the following terms may be used throughout this document. | Some of the following terms may be used throughout this document. | ||
{| class="wikitable" | {| class="wikitable" | ||
| | ! style="background-color: #555555; color: #FFFFFF;" |Term | ||
| | ! style="background-color: #555555; color: #FFFFFF;" |Description | ||
|- | |- | ||
|RAID | |RAID | ||
|RAID: Redundant Array of Independent Drives. A group of hard disks that operate together to improve performance or provide fault tolerance and error recovery through data striping, mirroring, and other techniques. | | RAID: Redundant Array of Independent Drives. A group of hard disks that operate together to improve performance or provide fault tolerance and error recovery through data striping, mirroring, and other techniques. | ||
|- | |- | ||
|BIOS | |BIOS | ||
|BIOS: Basic Input Output System. BIOS is actually firmware, the software that is programmed into a ROM (Read-Only Memory) chip built onto the motherboard of a computer | | BIOS: Basic Input Output System. BIOS is actually firmware, the software that is programmed into a ROM (Read-Only Memory) chip built onto the motherboard of a computer | ||
|- | |- | ||
|Flash | | Flash | ||
|A special type of EEPROM (Electrically Erasable Read Only Memory) that can be erased and reprogrammed in blocks instead of one byte at a time. Many modern PCs have their BIOS stored on a flash memory chip so that it can easily be updated if necessary. | |A special type of EEPROM (Electrically Erasable Read Only Memory) that can be erased and reprogrammed in blocks instead of one byte at a time. Many modern PCs have their BIOS stored on a flash memory chip so that it can easily be updated if necessary. | ||
|- | |- | ||
|POST | |POST | ||
| Line 28: | Line 28: | ||
|PATA: Parallel Advanced Technology Attachment is a standard [[Electrical connector|interface]] for connecting [[Computer storage|storage]] devices such as [[Hard disk|hard disks]] and [[CD-ROM]] drives inside [[Personal computer|personal computers]]. | |PATA: Parallel Advanced Technology Attachment is a standard [[Electrical connector|interface]] for connecting [[Computer storage|storage]] devices such as [[Hard disk|hard disks]] and [[CD-ROM]] drives inside [[Personal computer|personal computers]]. | ||
|- | |- | ||
|SATA | | SATA | ||
|SATA: Serial Advanced Technology Attachment was designed as a successor to the legacy [[AT Attachment|Advanced Technology Attachment]] standard (ATA) also known as Parallel ATA. | |SATA: Serial Advanced Technology Attachment was designed as a successor to the legacy [[AT Attachment|Advanced Technology Attachment]] standard (ATA) also known as Parallel ATA. | ||
|- | |- | ||
| Line 34: | Line 34: | ||
|congatec System Utility. Universal tool for BIOS updates and BIOS modifications. | |congatec System Utility. Universal tool for BIOS updates and BIOS modifications. | ||
|- | |- | ||
|CGOS | | CGOS | ||
|congatec Generic Operating System API. Software driver for the congatec Embedded BIOS features. | |congatec Generic Operating System API. Software driver for the congatec Embedded BIOS features. | ||
|} | |} | ||
==Introduction== | ==Introduction== | ||
| Line 65: | Line 57: | ||
This section describes how to setup and configure a conga-B945 or conga-BM45 based system to operate in Serial ATA RAID Level 1 (Mirror) mode while using Windows<sup>®</sup> XP. | This section describes how to setup and configure a conga-B945 or conga-BM45 based system to operate in Serial ATA RAID Level 1 (Mirror) mode while using Windows<sup>®</sup> XP. | ||
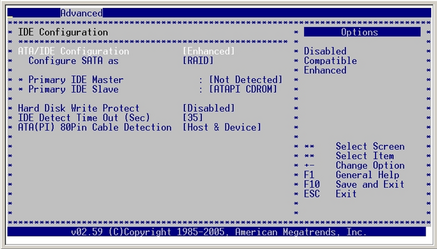
#Connect the CPU module to the baseboard. Attach two SATA RAID hard disk drives and enter the BIOS setup menu. Enter the 'IDE Configuration' setup node in the 'Advanced' menu and change the 'ATA/IDE Configuration' setting to [Enhanced].[[File:Configure RAID System (001).png|none|thumb|437x437px]] | # Connect the CPU module to the baseboard. Attach two SATA RAID hard disk drives and enter the BIOS setup menu. Enter the 'IDE Configuration' setup node in the 'Advanced' menu and change the 'ATA/IDE Configuration' setting to [Enhanced].[[File:Configure RAID System (001).png|none|thumb|437x437px]] | ||
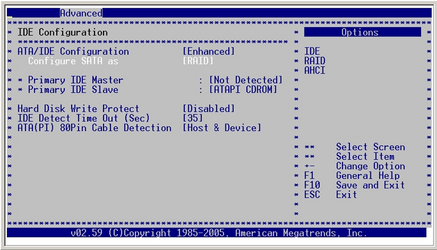
#Additional set 'Configure SATA as' to [RAID].[[File:Configure RAID System (002).png|none|thumb|437x437px]] | #Additional set 'Configure SATA as' to [RAID].[[File:Configure RAID System (002).png|none|thumb|437x437px]] | ||
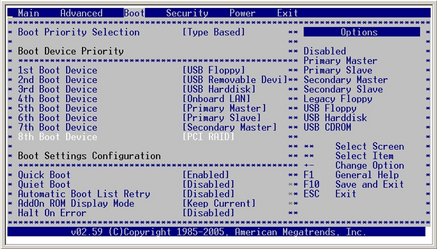
#Enter the 'Boot' menu. Set one of the boot devices to [PCI RAID] in the 'Boot Device Priority' list. It is important to note that the device that will be used to install the operating system must be listed above the 'PCI RAID' device in the 'Boot Device Priority' list. Below is as an example showing the 8th Boot Device selected as PCI RAID. Save the settings and exit the BIOS menu.[[File:Configure RAID System (003).png|none|thumb|437x437px]] | #Enter the 'Boot' menu. Set one of the boot devices to [PCI RAID] in the 'Boot Device Priority' list. It is important to note that the device that will be used to install the operating system must be listed above the 'PCI RAID' device in the 'Boot Device Priority' list. Below is as an example showing the 8th Boot Device selected as PCI RAID. Save the settings and exit the BIOS menu.[[File:Configure RAID System (003).png|none|thumb|437x437px]] | ||
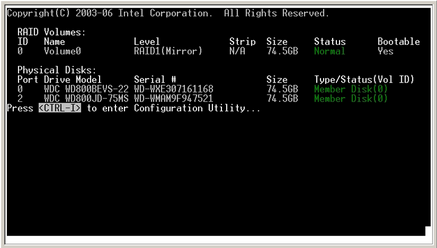
#The next step is to configure the Serial ATA RAID driver (Intel<sup>®</sup> Matrix Storage Manager). During POST, the following window is displayed for a short period of time. Enter the configuration utility by pressing <CTRL-I> when this window is displayed.[[File:Configure RAID System (004).png|none|thumb|437x437px]] | #The next step is to configure the Serial ATA RAID driver (Intel<sup>®</sup> Matrix Storage Manager). During POST, the following window is displayed for a short period of time. Enter the configuration utility by pressing <CTRL-I> when this window is displayed.[[File:Configure RAID System (004).png|none|thumb|437x437px]] | ||
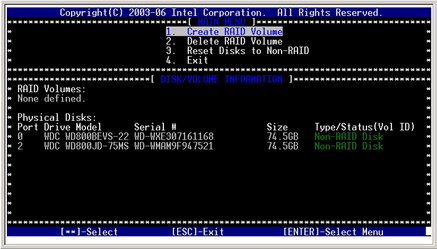
#In the storage manager's 'MAIN MENU' window the two attached SATA hard disk drives should be displayed in the 'Physical Disks' section. Choose item 1 'Create RAID Volume' and press <ENTER> to enter the 'CREATE VOLUME MENU'.[[File:Configure RAID System (005).png|none|thumb|437x437px]] | # In the storage manager's 'MAIN MENU' window the two attached SATA hard disk drives should be displayed in the 'Physical Disks' section. Choose item 1 'Create RAID Volume' and press <ENTER> to enter the 'CREATE VOLUME MENU'.[[File:Configure RAID System (005).png|none|thumb|437x437px]] | ||
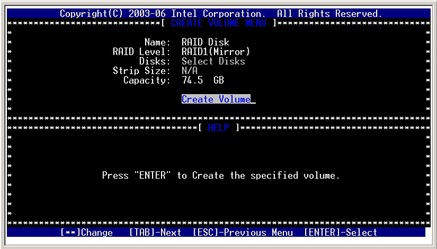
#In the 'CREATE VOLUME MENU' name the RAID hard disk drives and select a RAID Level from the list. Confirm the settings by selecting the 'Create Volume' option. For this application note RAID Level 1 (Mirror) is selected.[[File:Configure RAID System (006).png|none|thumb|437x437px]] | #In the 'CREATE VOLUME MENU' name the RAID hard disk drives and select a RAID Level from the list. Confirm the settings by selecting the 'Create Volume' option. For this application note RAID Level 1 (Mirror) is selected.[[File:Configure RAID System (006).png|none|thumb|437x437px]] | ||
| Line 78: | Line 70: | ||
7. Once back in the 'MAIN MENU' the chosen settings are displayed in the window. If the settings are correct, exit the configuration utility by selecting the <Exit> option. | 7. Once back in the 'MAIN MENU' the chosen settings are displayed in the window. If the settings are correct, exit the configuration utility by selecting the <Exit> option. | ||
[[File:Configure RAID System ( | |||
8. Download the Intel<sup>®</sup> Matrix Storage Manager (F6flpy32.zip) from the congatec homepage (<nowiki>http://www.congatec.com</nowiki>) and extract the contents. The contents of this zip file are required to pre-install the SATA RAID driver using the <F6> method during | [[File:Configure RAID System (Ergänzung).png|none|thumb|438x438px]] | ||
8. Download the Intel<sup>®</sup> Matrix Storage Manager (F6flpy32.zip) from the congatec homepage (<nowiki>http://www.congatec.com</nowiki>) and extract the contents. The contents of this zip file are required to pre-install the SATA RAID driver using the <F6> method during | |||
Microsoft Windows XP setup. Prepare a floppy disk as described in section 5.3 of the 'Readme.txt' file included in the zip file. | Microsoft Windows XP setup. Prepare a floppy disk as described in section 5.3 of the 'Readme.txt' file included in the zip file. | ||
| Line 90: | Line 84: | ||
''' | '''Note:''' | ||
'''''Legacy floppy is not supported on the conga-B945 and on the conga-BM45 therefore a USB floppy drive must used.''''' | '''''Legacy floppy is not supported on the conga-B945 and on the conga-BM45 therefore a USB floppy drive must used.''''' | ||
| Line 107: | Line 101: | ||
''' | '''Note:''' | ||
'''''The screenshot is from a conga-B945 equipped system. A conga-BM45 equipped system screenshot would be identical.''''' | '''''The screenshot is from a conga-B945 equipped system. A conga-BM45 equipped system screenshot would be identical.''''' | ||
==Setup and configure a SATA RAID Level 1 System with the conga-XLX== | ==Setup and configure a SATA RAID Level 1 System with the conga-XLX == | ||
This section describes how to setup and configure a conga-XLX based system to operate in Serial ATA RAID Level 1 (Mirror) mode while using Windows<sup>®</sup> XP. | |||
This section describes how to setup and configure a conga-XLX based system to operate in Serial ATA RAID Level 1 (Mirror) mode while using Windows<sup>®</sup> XP. | |||
#Connect the conga-XLX CPU module to the baseboard and attach two SATA RAID hard disk drives to the system. A change of a BIOS settings is not necessary. | #Connect the conga-XLX CPU module to the baseboard and attach two SATA RAID hard disk drives to the system. A change of a BIOS settings is not necessary. | ||
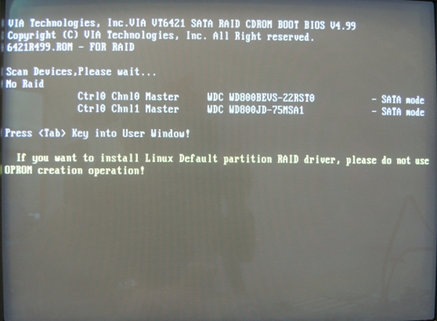
#Boot your system. During POST the following window for the onboard VIA VT6421 SATA RAID Controller is displayed for a short period of time. Enter the configuration utility by pressing the <Tab> key.[[File:Configure RAID System (010).png|none|thumb|437x437px]] | #Boot your system. During POST the following window for the onboard VIA VT6421 SATA RAID Controller is displayed for a short period of time. Enter the configuration utility by pressing the <Tab> key.[[File:Configure RAID System (010).png|none|thumb|437x437px]] | ||
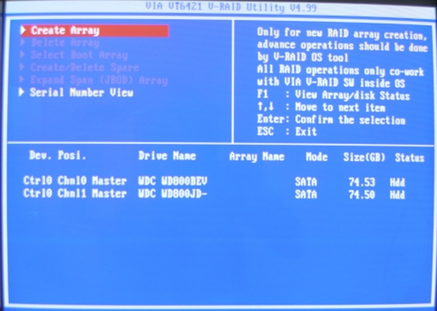
#The two attached SATA hard disk drives are displayed (as pictured below) in the main menu of the RAID configuration utility. Choose the 'Create Array' selection from the list, which is used for a new RAID array creation and confirm the selection by pressing <Enter>.[[File:Configure RAID System (011).png|none|thumb|437x437px]] | # The two attached SATA hard disk drives are displayed (as pictured below) in the main menu of the RAID configuration utility. Choose the 'Create Array' selection from the list, which is used for a new RAID array creation and confirm the selection by pressing <Enter>.[[File:Configure RAID System (011).png|none|thumb|437x437px]] | ||
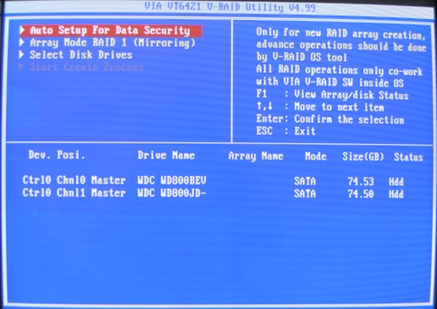
#In the 'Create Array' menu window first select the 'Array Mode RAID 1 (Mirroring)' from the list. Once this is done then move up to the 'Auto Setup For Data Security' selection and confirm using <Enter>. A message appears that the data on the selected disks will be destroyed. Continue by selecting <YES>.[[File:Configure RAID System (012).png|none|thumb|437x437px]] | #In the 'Create Array' menu window first select the 'Array Mode RAID 1 (Mirroring)' from the list. Once this is done then move up to the 'Auto Setup For Data Security' selection and confirm using <Enter>. A message appears that the data on the selected disks will be destroyed. Continue by selecting <YES>.[[File:Configure RAID System (012).png|none|thumb|437x437px]] | ||
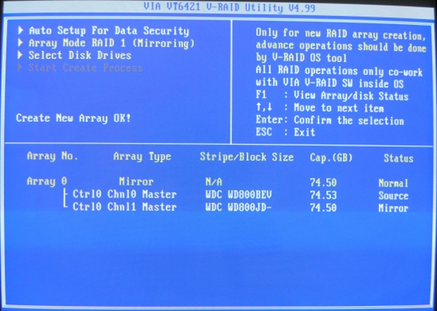
#Another message shows that a new array is created. Now the two SATA hard disk drives are combined to one array (Array 0 in the picture below). Exit the 'Create Array' menu by pressing <ESC>.[[File:Configure RAID System (013).png|none|thumb|437x437px]] | #Another message shows that a new array is created. Now the two SATA hard disk drives are combined to one array (Array 0 in the picture below). Exit the 'Create Array' menu by pressing <ESC>.[[File:Configure RAID System (013).png|none|thumb|437x437px]] | ||
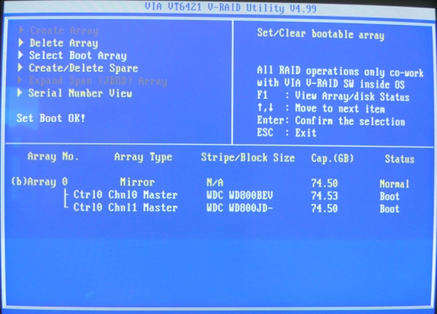
#Back in the main menu of the RAID configuration utility, go to the item 'Select Boot Array' and highlight the earlier created array (Array 0). A green letter b appears in brackets (b) in front of the selected array. Additionally, the message “Set Boot OK!” will be displayed in the upper left window. Exit the main menu by pressing <ESC> and confirm by selecting <YES>.[[File:Configure RAID System (014).png|none|thumb|437x437px]] | #Back in the main menu of the RAID configuration utility, go to the item 'Select Boot Array' and highlight the earlier created array (Array 0). A green letter b appears in brackets (b) in front of the selected array. Additionally, the message “Set Boot OK!” will be displayed in the upper left window. Exit the main menu by pressing <ESC> and confirm by selecting <YES>.[[File:Configure RAID System (014).png|none|thumb|437x437px]] | ||
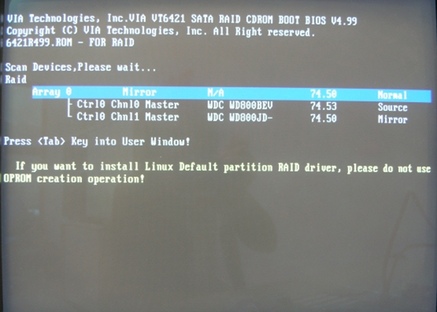
#When rebooting the system, the onboard VIA VT6421 SATA RAID controller scans for devices and will now indicate that the two attached SATA hard disk drives are ready for RAID. The message pictured below will appear for a short period of time during POST.[[File:Configure RAID System (015).png|none|thumb|437x437px]] | # When rebooting the system, the onboard VIA VT6421 SATA RAID controller scans for devices and will now indicate that the two attached SATA hard disk drives are ready for RAID. The message pictured below will appear for a short period of time during POST.[[File:Configure RAID System (015).png|none|thumb|437x437px]] | ||
#Download the VIA VT6421 SATA RAID driver (vt6421_win2kxp.zip) from the congatec homepage (<nowiki>http://www.congatec.com</nowiki>) and extract the contents. The contents of this zip file are required to pre-install the SATA RAID driver using the <F6> method during Microsoft Windows''<sup>®</sup>'' XP setup. Prepare a floppy disk as described in the 'Readme.txt' file included in the zip file. | #Download the VIA VT6421 SATA RAID driver (vt6421_win2kxp.zip) from the congatec homepage (<nowiki>http://www.congatec.com</nowiki>) and extract the contents. The contents of this zip file are required to pre-install the SATA RAID driver using the <F6> method during Microsoft Windows''<sup>®</sup>'' XP setup. Prepare a floppy disk as described in the 'Readme.txt' file included in the zip file. | ||
#Attach a floppy disk drive to the system. Reboot the system from the installation CD for Windows''<sup>®</sup>'' XP and start the installation process. Immediately after the start of the Windows''<sup>®</sup>'' XP Setup, press <F6> to install the third party SCSI/RAID driver. Later on during setup, Windows''<sup>®</sup>'' XP will request that the device support disk for mass storage devices be inserted. When this request appears, insert the previously prepared floppy disk into the floppy drive. Press the <nowiki><S> (<Z> for German installation) to implement the RAID driver. Choose the SATA RAID driver (VIA RAID Controller (Windows XP)) from the displayed list and confirm by pressing <Enter>.</nowiki> | #Attach a floppy disk drive to the system. Reboot the system from the installation CD for Windows''<sup>®</sup>'' XP and start the installation process. Immediately after the start of the Windows''<sup>®</sup>'' XP Setup, press <F6> to install the third party SCSI/RAID driver. Later on during setup, Windows''<sup>®</sup>'' XP will request that the device support disk for mass storage devices be inserted. When this request appears, insert the previously prepared floppy disk into the floppy drive. Press the <nowiki><S> (<Z> for German installation) to implement the RAID driver. Choose the SATA RAID driver (VIA RAID Controller (Windows XP)) from the displayed list and confirm by pressing <Enter>.</nowiki> | ||
Revision as of 09:15, 7 August 2024
| Applicable Products | conga-XLX, conga-CLX, conga-B945, conga-BM45 |
Preface
This application note is a short example of how to setup and configure a system to operate in RAID Level 1 (Mirror) with two Serial ATA (SATA) hard disk drives (HDD) while using Microsoft Windows® XP.
Terminology
Some of the following terms may be used throughout this document.
| Term | Description |
|---|---|
| RAID | RAID: Redundant Array of Independent Drives. A group of hard disks that operate together to improve performance or provide fault tolerance and error recovery through data striping, mirroring, and other techniques. |
| BIOS | BIOS: Basic Input Output System. BIOS is actually firmware, the software that is programmed into a ROM (Read-Only Memory) chip built onto the motherboard of a computer |
| Flash | A special type of EEPROM (Electrically Erasable Read Only Memory) that can be erased and reprogrammed in blocks instead of one byte at a time. Many modern PCs have their BIOS stored on a flash memory chip so that it can easily be updated if necessary. |
| POST | Power-on Self Test. A diagnostic testing sequence run by a computer’s BIOS as the computer’s power is initially turned on. The POST will determine if the computer’s RAM, disk drives, peripheral devices and other hardware components are properly working. |
| PATA | PATA: Parallel Advanced Technology Attachment is a standard interface for connecting storage devices such as hard disks and CD-ROM drives inside personal computers. |
| SATA | SATA: Serial Advanced Technology Attachment was designed as a successor to the legacy Advanced Technology Attachment standard (ATA) also known as Parallel ATA. |
| CGUTIL | congatec System Utility. Universal tool for BIOS updates and BIOS modifications. |
| CGOS | congatec Generic Operating System API. Software driver for the congatec Embedded BIOS features. |
Introduction
The following sections describe how to setup and configure a system to operate in RAID Level 1 (Mirror) with two SATA hard disk drives while using Microsoft Windows® XP. RAID Level 1 uses disk mirroring, which provides 100% duplication of data. This offers the highest reliability. RAID Level 0 is also supported but has yet to be tested therefore is not included in this application note.
The first section of this application note describes the steps that must be done when using the conga-B945 or the conga-BM45 CPU module. The conga-B945 utilizes Intel's ICH7M-DH I/O controller hub, which supports Intel® Matrix Storage Technology that provides integrated RAID Level 0 and Level 1 functionality on the two SATA ports. The conga-BM45 utilizes Intel´s ICH9M-E I/O controller hub.
The second section covers the required steps that must be done when using a conga-XLX or a conga-CLX CPU module. The LX800 based platform has an onboard VIA VT6421 Serial ATA RAID Controller that supports RAID Level 0 and RAID Level 1 functionality on the two SATA ports.
Software components include an option ROM for pre-boot configuration and boot functionality, a Microsoft Windows® compatible driver ('F6flpy32.zip' for the conga-B945 and conga-BM45 or 'vt6421_win2kxp.zip' for the conga-XLX/CLX), and a user interface for configuration and management of the RAID capability.
Notes:
Parallel ATA (PATA) RAID is not supported.
In order to ensure proper RAID functionality, it is recommended that the two SATA hard disk drives that are being used have the same storage capacity. Furthermore, using the Intel® Matrix Storage Manager to reduce the capacity of the SATA hard disk drive is not recommended. This may cause a malfunction of the SATA RAID functionality.
Setup and configure a SATA RAID Level 1 System with the conga-B945/BM45
This section describes how to setup and configure a conga-B945 or conga-BM45 based system to operate in Serial ATA RAID Level 1 (Mirror) mode while using Windows® XP.
- Connect the CPU module to the baseboard. Attach two SATA RAID hard disk drives and enter the BIOS setup menu. Enter the 'IDE Configuration' setup node in the 'Advanced' menu and change the 'ATA/IDE Configuration' setting to [Enhanced].
- Additional set 'Configure SATA as' to [RAID].
- Enter the 'Boot' menu. Set one of the boot devices to [PCI RAID] in the 'Boot Device Priority' list. It is important to note that the device that will be used to install the operating system must be listed above the 'PCI RAID' device in the 'Boot Device Priority' list. Below is as an example showing the 8th Boot Device selected as PCI RAID. Save the settings and exit the BIOS menu.
- The next step is to configure the Serial ATA RAID driver (Intel® Matrix Storage Manager). During POST, the following window is displayed for a short period of time. Enter the configuration utility by pressing <CTRL-I> when this window is displayed.
- In the storage manager's 'MAIN MENU' window the two attached SATA hard disk drives should be displayed in the 'Physical Disks' section. Choose item 1 'Create RAID Volume' and press <ENTER> to enter the 'CREATE VOLUME MENU'.
- In the 'CREATE VOLUME MENU' name the RAID hard disk drives and select a RAID Level from the list. Confirm the settings by selecting the 'Create Volume' option. For this application note RAID Level 1 (Mirror) is selected.
.png)
.png)
.png)
.png)
.png)
.png)
Note:
Using the Intel® Matrix Storage Manager to reduce the capacity of the SATA hard disk drive is not recommended. This may cause a malfunction of the SATA RAID functionality.
7. Once back in the 'MAIN MENU' the chosen settings are displayed in the window. If the settings are correct, exit the configuration utility by selecting the <Exit> option.
.png)
8. Download the Intel® Matrix Storage Manager (F6flpy32.zip) from the congatec homepage (http://www.congatec.com) and extract the contents. The contents of this zip file are required to pre-install the SATA RAID driver using the <F6> method during
Microsoft Windows XP setup. Prepare a floppy disk as described in section 5.3 of the 'Readme.txt' file included in the zip file.
9. Attach a floppy disk drive to the system. Reboot the system from the installation CD for Windows® XP and start the installation process. Immediately after the start of the Windows® XP Setup, press <F6> to install the third party SCSI/RAID driver. Later on
during setup, Windows® XP will request that the device support disk for mass storage devices be inserted. When this request appears, insert the previously prepared floppy disk into the floppy drive. Press the <S> (<Z> for German installation) to implement
the RAID driver. Choose the SATA RAID driver (Intel(R) 82801GHM SATA RAID Controller (Mobile ICH7MDH) from the displayed list and confirm by pressing <Enter>.
Note:
Legacy floppy is not supported on the conga-B945 and on the conga-BM45 therefore a USB floppy drive must used.
Be aware that not all USB Floppy disk drives are supported by Windows XP during installation. Refer to the Microsoft® support homepage
(Article ID 916196): http://support.microsoft.com/kb/916196/en-us.
.png)
10. The SATA RAID driver is now included in the operating system software. Continue and finish the installation by following the Microsoft Windows® XP installation commands.
11. After the installation is finished, the easiest way to determine the mode is to identify how the Serial ATA controller is presented within the Device Manager. Information about how this can be done can be found in section 4 of the 'Readme.txt' file that is part
of the F6flpy32.zip.
Note:
The screenshot is from a conga-B945 equipped system. A conga-BM45 equipped system screenshot would be identical.
Setup and configure a SATA RAID Level 1 System with the conga-XLX
This section describes how to setup and configure a conga-XLX based system to operate in Serial ATA RAID Level 1 (Mirror) mode while using Windows® XP.
- Connect the conga-XLX CPU module to the baseboard and attach two SATA RAID hard disk drives to the system. A change of a BIOS settings is not necessary.
- Boot your system. During POST the following window for the onboard VIA VT6421 SATA RAID Controller is displayed for a short period of time. Enter the configuration utility by pressing the <Tab> key.
- The two attached SATA hard disk drives are displayed (as pictured below) in the main menu of the RAID configuration utility. Choose the 'Create Array' selection from the list, which is used for a new RAID array creation and confirm the selection by pressing <Enter>.
- In the 'Create Array' menu window first select the 'Array Mode RAID 1 (Mirroring)' from the list. Once this is done then move up to the 'Auto Setup For Data Security' selection and confirm using <Enter>. A message appears that the data on the selected disks will be destroyed. Continue by selecting <YES>.
- Another message shows that a new array is created. Now the two SATA hard disk drives are combined to one array (Array 0 in the picture below). Exit the 'Create Array' menu by pressing <ESC>.
- Back in the main menu of the RAID configuration utility, go to the item 'Select Boot Array' and highlight the earlier created array (Array 0). A green letter b appears in brackets (b) in front of the selected array. Additionally, the message “Set Boot OK!” will be displayed in the upper left window. Exit the main menu by pressing <ESC> and confirm by selecting <YES>.
- When rebooting the system, the onboard VIA VT6421 SATA RAID controller scans for devices and will now indicate that the two attached SATA hard disk drives are ready for RAID. The message pictured below will appear for a short period of time during POST.
- Download the VIA VT6421 SATA RAID driver (vt6421_win2kxp.zip) from the congatec homepage (http://www.congatec.com) and extract the contents. The contents of this zip file are required to pre-install the SATA RAID driver using the <F6> method during Microsoft Windows® XP setup. Prepare a floppy disk as described in the 'Readme.txt' file included in the zip file.
- Attach a floppy disk drive to the system. Reboot the system from the installation CD for Windows® XP and start the installation process. Immediately after the start of the Windows® XP Setup, press <F6> to install the third party SCSI/RAID driver. Later on during setup, Windows® XP will request that the device support disk for mass storage devices be inserted. When this request appears, insert the previously prepared floppy disk into the floppy drive. Press the <S> (<Z> for German installation) to implement the RAID driver. Choose the SATA RAID driver (VIA RAID Controller (Windows XP)) from the displayed list and confirm by pressing <Enter>.
.png)
.png)
.png)
.png)
.png)
.png)
Note:
Be aware that not all USB Floppy disk drives are supported by Windows XP during installation. Refer to the Microsoft® support homepage
(Article ID 916196): http://support.microsoft.com/kb/916196/en-us.
10. The SATA RAID driver is now included in the operating system software. Continue and finish the installation by following the Microsoft Windows® XP installation commands.
11. After the installation is finished, the easiest way to determine the mode is to identify how the Serial ATA controller is presented within the Device Manager.