All congatec products that support the RTS Hypervisor
Preface
This Application Note gives a general overview of how to install, configure, use and troubleshoot the RTS Hypervisor on congatec x86-based modules.
For more information about the RTS Hypervisor, refer to the RTS Hypervisor Manual “RTS-Hypervisor.pdf”.
Terminology
Term
Description
ESP
EFI System Partition
GPOS
General-Purpose Operating System
OS
Operating System
RTS
Real Time Systems
RTOS
Real-Time Operating System
Introduction
As part of the aReady.COM strategy, the RTS Hypervisor is now integrated into the congatec firmware by default on congatec x86-based modules. The integrated RTS Hypervisor offers a 30-day free evaluation license. The 30-day evaluation starts when the customer receives the x86-based modules.
The Real-Time Operating System images, driver packages for the General-Purpose Operating System and the installation procedures for the Operating Systems are available for download in the restricted area of congatec website at www.congatec.com/login.
The packages available for download are listed in the table below.
Package Name
Description
RTH-Release_R5.7.03.31618_INtime_runtime.zip
Prepared Evaluation Package for INtime DRTOS
RTH-Release_R5.7.03.31618_Linux-rt_runtime.zip
Prepared Evaluation Package for Debian with prempt-rt
Prepared Evaluation Package for Debian with Xenomai
RTH-Release_R5.7.03.31618_QNX_runtime.zip
Prepared Evaluation Package for BlackBerry QNX. Only provided with GPOS Windows
RTH-Release_R5.7.03.31618_VxWorks_runtime.zip
Prepared Evaluation Package for WindRiver VxWorks
Installing the Packages
This section describes how to install and configure the packages for the integrated RTS Hypervisor.
Installation Requirements
Before you install the packages for the integrated RTS Hypervisor:
Make sure a General-Purpose Operating System (GPOS) is pre-installed. The General-Purpose Operating System must be installed on a mass storage connected to an AHCI controller or an NVMe controller.
Assign at least 128 GB storage to the System Drive (C:) if you use Microsoft Windows OS as General-Purpose Operating System. The System Drive must have at least 4GB of free disk space.
If you use a Linux OS as General-Purpose Operating System, the ESP partition must have at least 300 MB of free disk space. The root file system must have at least 1 GB of free disk space.
Download Installation Package
Log in to the congatec customer portal at www.congatec.com/login
In the "Technical Information" list, click "Virtualization Ready RTOS Packages". The package page opens.
Download the appropriate packages for your GPOS.
Install the Downloaded Package
The downloaded package contains installation scripts for both Windows and Linux General-Purpose Operating Systems.
Run the installation_for_windows.bat script for systems pre-installed with Windows Operating System. The installation steps are described in section 2.2.1 “Windows Operating System”. For systems pre-installed with Linux Operating System, run the installation_for_linux.sh script. The installation steps are described in section 2.2.2 “Linux Operating System”.
Windows Operating System
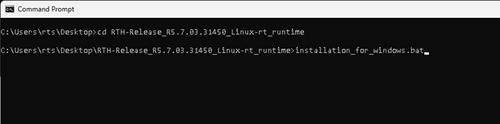
Unzip the downloaded package for your intended Real Time Operating System to a location on your system for the RTS Hypervisor. For example, C:\Users\rts\Desktop.
Open the command prompt.
Navigate to the directory of the extracted package. For example:
cd RTH-Release_R5.7.03.31450_Linux-rt_runtime
Type installation_for_windows.bat and press Enter.
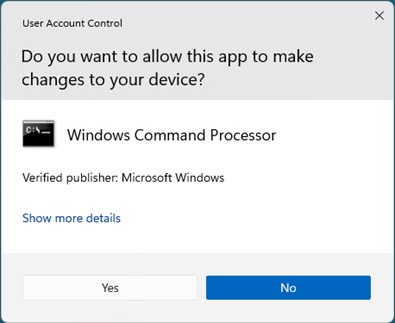
The User Account Control prompot appears
Click Yes to confirm.
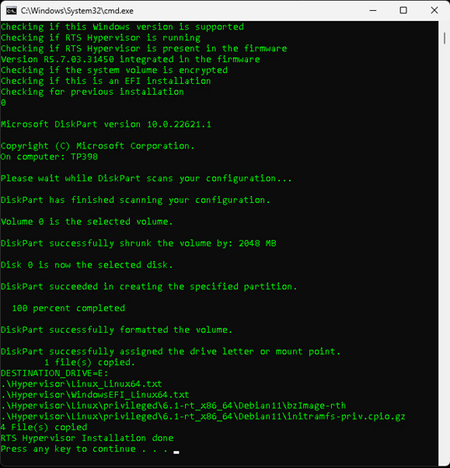
The installation process begins. The output of the command line is shown below:
The installation is complete, when the command line output shows "RTS Hypervisor Installation done".
Linux Operating System
Open the command line interface.
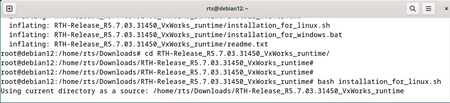
Unzip the downloaded package for your intended Real Time Operating System to a location on your system for the RTS Hypervisor. For example, /home/rts/Downloads.
Navigate to the directory of the extracted package. For example:
#cd RTH-Release_RS.7.03.31450_VxWorks_runtime/
Type "bash installation_for_linux.sh" to run the installation script (requires root privilege)
#bash installation_for_linux.sh
The installation process begins. The output of the command line interface is shown below:
The installation is complete, when the command line output shows "Script finished successfully".
Select Boot Priority
To activate the RTS Hypervisor, you need to change the "1st Boot Device" in the BIOS setup menu to "Integrated RTS Hypervisor".
Press F2 or DEL during POST to enter the BIOS setup menu.
Go to the Boot tab to enter the Boot setup screen.
Select "Integrated RTS Hypervisor" as "1st Boot Device".
Go to the Save & Exit tab and select "Save Changes and Exit".
The system restarts.
Note:
The configuration steps and the BIOS setup menu above are valid for "Type Based Boot Priority".
Boot Messages and First Steps
Sample screen shot of the RTS-Hypervisor boot messages.
When the system starts or restarts, the General-Purpose Operating System controls are screen while the Real-Time Operating System runs silently in the background.
The pre-built congatec demo images for Linux, VxWorks and QNX real-time systems contain a telnet server. Connection to the telnet server is possible with the default. IP address (192.168.2.2) of the virtual network in the Real-Time Operating System. For information about user credentials, see the RTS-Hypervisor.pdf manual included in the download package. The INtime D-RTOS demo image does not contain a telnet server. It uses a webserver. To access the webserver, open a web browser on your General-Purpose Operating System and go to http://192.168.2.2. For more details, see the RTS-Hypervisor.pdf manual included in the download package.
Override the Default Boot Selection Manually
You can override the hypervisor as the default boot selection if the RTS Hypervisor has configuration issues. To override the hypervisor:
Turn on the system.
Press F11 to enter the Boot menu.
Select the General-Purpose Operating System from the Boot Menu. For example, the Windows EFI Boot Manager in the image below.
Configuration Files and Folders
This section provides the location of files and folders required for further customization or configuration.
Important Configuration Files
The following files are important for configuration:
Bootloader configuration file RthLdr.config. The RthLdr.config file is a json text file format that points to RTOS image(s), RTS Hypervisor configuration file and the EFI boot file of the General-Purpose Operating System. The RthLdr.config file is located in \EFI\rts folder. You may modify this file if you want to rename or rebase the RTS Hypervisor configuration file or the RTOS image(s).
Sample configuration files for the RTS Hypervisor: The download package contains sample configuration files. The configuration file names may change depending on the downloaded package and the pre-installed General-Purpose Operating System. The format for the sample configuration file name is: (Pre-installed General-Purpose OS)_(Real-Time OS in download package).txt. For example: Linux_VxWorks64.txt, WindowsEFI_Linux.txt, Linux_INtime.txt or WindowsEFI_QNX.64txt. The sample configuration file is located in the \rth folder. You may modify this file to change the default CPU assignment, assign additional RAM to the RTOS or assign PCI(e), Mass Storage or USB devices according to your use case.
System files for the Real-Time Operating System: The image files which contain the Real-Time Operating Systems are located in the \rth\<RTOS>\ folder. The filesystems created from these images are non-persistent because they are created in the RAM. Changes to these file systems will be lost when the RTOS is restarted.
Note:
The folder structure above is for a Windows General-Purpose Operating System. During installation, a new FAT partition labelled "RTHDATA" is created. This partition contains the described files/folders. For Linux General-Purpose Operating System, the setup destination is the EFI System Partition which is mounted to /boot/EFI
Configuring the Bootloader
The integrated RTS Hypervisor firmware uses a new congatec bootloader. The bootloader requires a configuration file. The file is for configuring the bootloader, but it also offers extended options for advanced RTS Hypervisor integrators and for variant-specific custom configurations with congatec support team.
Configuring the Partition
The congatec bootloader can access FAT partitions and its configuration file is in JSON file format. If you have a syntax problem during configuration, use an online JSON tool (for example, https://jsonlint.com/) to verify the JSON file format.
ESP Partition
For Linux GPOS, the bootloader configuration and all other files loaded by the boot loader are installed to the ESP partition. The ESP partition is of partition type FAT. The sample shows the RthLdr.config for a Linux GPOS installation. In Linux GPOS installations, the ESP partition is typically mounted to the mount point /boot/efi.
The bootloader supports access of up to two FAT partitions for loading components. The first partition is identified by the location of the configuration file EFI\rts\RthLdr.config. The second partition can be the ESP (EFI System Partition).
The Windows boot loader is located in the ESP. To make the bootloader refer to the ESP, the corresponding module entry must contain an additional parameter “type” which must be set to "efi" (see sample configuration).
To update the information in the license file, you need to load a new module from the RthLdr.config (create a new license.txt file).
Follow the steps below to override the integrated license file:
Copy the new license.txt file to the designated location:
For a Windows GPOS installation, copy the new license.txt file to \EFI\rth folder in the "RTHDATA" partition.
For a GPOS Linux installation, copy the new license.txt to the \boot\efi\rth\ (or\boot\EFI\rth\) Linux folder.
Update the contents of RthLdr.config to load the license.txt file from the file system. The sample configuration below highlights the expected change in Windows GPOS:
.png)
.png)
.png)
.png)
.png)
.png)
.png)
.png)
.png)
.png)